On April 1st, 2022, a security code will be required when calling or chatting with our Support team. Our Support team will use your security code to quickly verify that you have ownership or authorization to make requests or changes to an account.
A security code can be created for the account and made viewable for each authorized contact or user on the account. Or each authorized contact or user on the account can have a unique security codeA Phone/Chat Code is an optional account verification feature within your Portal account. Creating a phone/chat code allows you to conveniently authorize work to be completed by our Support Team when communicating via phone calls or chat sessions. You may also use this code when requesting minor changes to products or services on your account. Mention this code when communicating with our Support team.
Note: Significant service changes or cancellations will require additional approval.
You may create a phone/chat code for an entire account or each authorized contact or user on the account. Customize these permissions according to the specific roles and security protocols within your organization.
| Warning |
|---|
Security code access |
| Warning |
Access to Phone/Chat codes should only be given to users with approval to submit requests to our Support team, as requests may incur additional costs to expected monthly services. |
Step-by-step guides in this article:
- Your account-wide security code
- Allowing your other users to see the account-wide code
- Creating individual codes for your other users
- Changing permissions for your other users
- Managing Phone/Chat Codes
- Managing Phone/Chat Codes
- Managing Phone/Chat Codes
- Managing Phone/Chat Codes
| Anchor | ||||
|---|---|---|---|---|
|
Your account-wide
...
security code
Follow these steps to create or change the account-wide phone/chat security code for your account.
Step 1: Log in to the Vivio Client Portal.
...
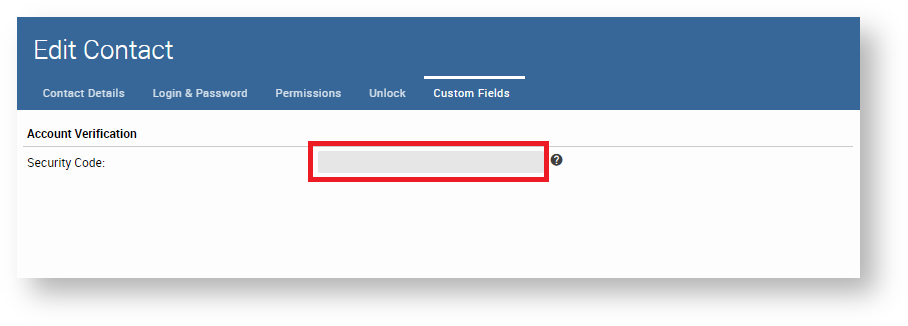
Step 3: Scroll down to "CUSTOM FIELDS" and select "Edit."
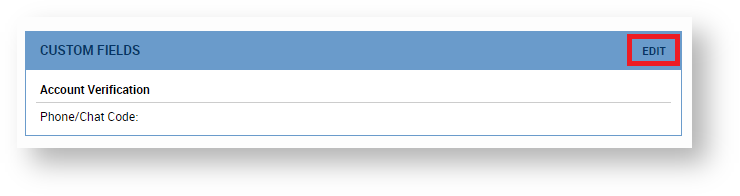

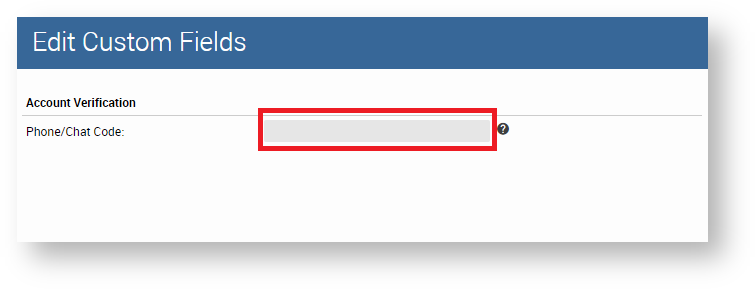
Step 4: In the new pop-up that opens, choose a new Phone/Chat Security Code and type it in. (A minimum of eight characters is required. Do not use personally identifiable information such as your Social Security number or date of birth.)
Step 5: Select "Save Changes" on the bottom right-hand corner. The pop-up will close.
...
Step 6: A message will appear at the top of your screen. "Success: Account information updated." Your account-wide phone/chat security code is now ready to use!
...
If you need any help creating or changing the Phone/Chat Code security code for your account, please get in touch with our Support team.
...
| Anchor | ||||
|---|---|---|---|---|
|
Allowing your other users to see the account-wide code
Follow these steps to let another user see your view the account-wide phone/chat security code.
Step 1: Log in to the Vivio Client Portal.
...
Step 3: Select "Edit" on the line to the right of the contact. A new pop-up will open.


Step 4: In the new pop-up that has opened, select the "Permissions" tab at the top.
...
Step 8: A message will appear at the top of your screen. "Success: Contact updated." This user is now able to view the account-wide phone/chat security code. Repeat these steps for each additional user.
...
If you need any help changing the permissions for your account-wide phone/chat security code, please get in touch with our Support team.
...
| Anchor | ||||
|---|---|---|---|---|
|
Creating individual codes for your other users
Follow these steps to create a unique phone/chat security code for a user on your account.
...
Step 3: Select "Edit" to the right of the contact listing. A new pop-up will open.

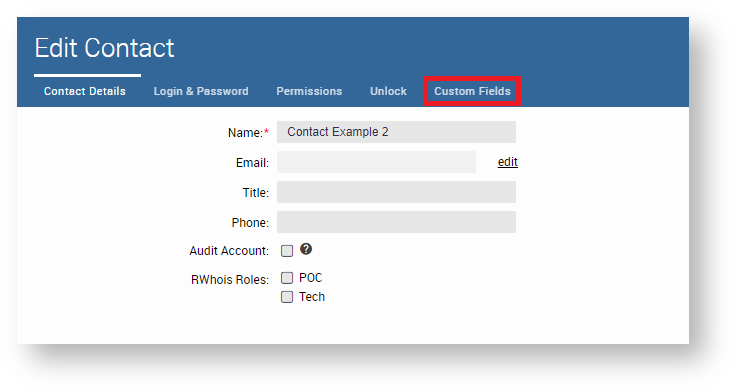
Step 4: In the new pop-up that opens, select the "Custom Fields" tab at the top.
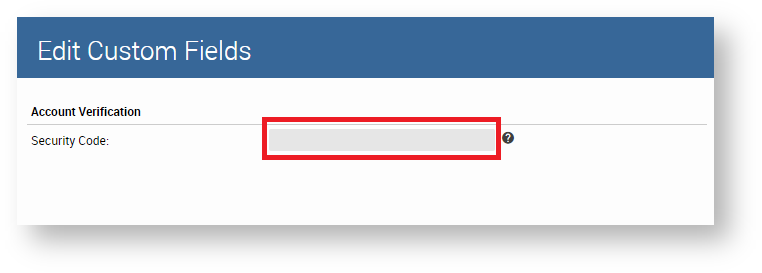
Step 5: Select a new Phone/Chat Security Code and type it in. (A minimum of eight characters is required. Do not use personally identifiable information such as your Social Security number or date of birth.)
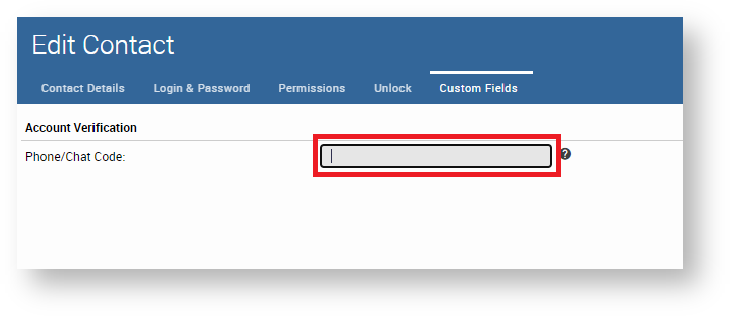
Step 6: Select "Update" on the bottom right-hand corner. The pop-up will close.
...
Step 7: A message will appear at the top of your screen. "Success: Contact updated." This phone/chat security code is now ready for use! (Be sure to let this user know what it is!) Repeat these steps for each additional user.
...
If you need any help creating or changing a phone/chat security code for a user on your account, please get in touch with our Support team.
...
| Anchor | ||||
|---|---|---|---|---|
|
Changing permissions for your other users
Follow these steps for a user to be able to view or edit their unique code.
...
Step 3: Select "Edit" to the right of the contact listing. A new pop-up will open.

Step 4: In the new pop-up that has opened, select the "Permissions" tab at the top.
...
Step 8: A message will appear at the top of your screen. "Success: Contact updated." This user can now view and update their phone/chat security code. Repeat these steps for each additional user.
...
If you need any help updating permissions for the other users on your account, please get in touch with our Support team.
Related articles
| Content by Label | ||||||||||||||||||
|---|---|---|---|---|---|---|---|---|---|---|---|---|---|---|---|---|---|---|
|
...