This article will guide you in configuring your server to resolve locally. Examples are provided for several system configurations.
Step-by-step guide - Linux
First you'll want to edit the named.conf file. The path to this file depends on the Linux Distro and the Control Panel installed. The paths are listed in this table:
| Control Panel | Path |
|---|
| Kloxo | /var/named/chroot/etc/named.conf |
| VirtualMin | /etc/named.conf |
| cPanel | /etc/named.conf |
| Distro (no Control Panel) | Path |
| Ubuntu/Debian | /etc/bind/named.conf |
| CentOS/Redhat | /etc/named.conf |
|
|
Using a text editor (such as vim, nano, or emacs), open this file, then see if you can find the options section, adding this line:
allow-recursion { 127.0.0.1; }; |
In some cases this file may include other config files, such as Kloxo's. It looks like this:
//Kloxo
include "/etc/kloxo.named.conf";

//Kloxo global config (stop being open recursors)
include "/etc/global.options.named.conf"; |
In this case, you can add an options section yourself, making the resulting file look like this:
options {
    allow-recursion {127.0.0.1;};
};

//Kloxo
include "/etc/kloxo.named.conf";

//Kloxo global config (stop being open recursors)
include "/etc/global.options.named.conf"; |
Then run the command: service named restart
on debian/Ubuntu: service bind9 restart
edit /etc/resolv.conf
Replace these lines:
nameserver 208.77.208.4
nameserver 208.77.208.5 |
with this one:
Verify you can ping domains outside of the server such as google.com, facebook.com, yahoo.com etc.
Step-by-step guide - Windows
- Update DNS Server settings
- Open the Windows DNS Manager:
- Start > Search for DNS will usually find it
- Right click your server, and left click properties
- Click the Root Hints tab, click copy from server, type in 208.77.208.4 and click ok
- After copying these, make sure they resolve
- Select an item in the Name servers list
- Click Edit
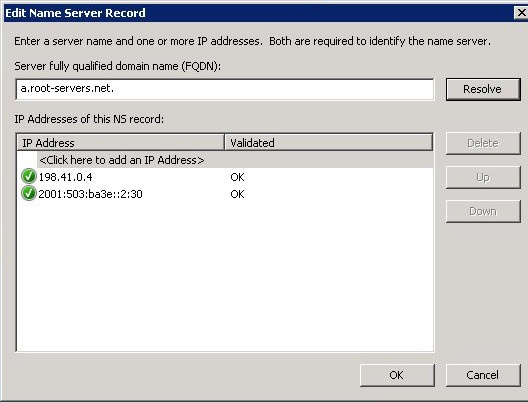
- Click on the Resolve button.
It should return with an IP address and OK in the Validated section like this:

- Update Network adapter settings
- Open Network and Sharing Center > Change Adapter Settings > Right click your Local Area Connection > Internet Protocol Version 4 > Properties
- Change your preferred DNS Server to 127.0.0.1, and remove the Alternate DNS Server.
Hopefully this has been helpful, but as always, please contact our Support staff if you need help. They can be reached by email, web chat, or phone, 24/7/365.
Related articles
Related articles appear here based on the labels you select. Click to edit the macro and add or change labels.

