This article will talk about how to create additional, full-featured domains within your existing Vivio Shared Hosting account. These domains will come with all the same features that your Primary Domain has, and you will have some control over what resources these sites use from within your account.
Assumptions
This article assumes you have a basic understanding of what a domain is, its components, and how it works. For example, you’ll need to understand that a Top Level Domain (TLD) means the latter part of a domain name, like .net, .com, .org, .us, .io, etc.
It also assumes you have a basic understanding of FTP or other method to transfer your site files to your hosting account here at Vivio.
Lastly, this article will also assume you have purchased a shared hosting account with Vivio and have been able to log in and access your cPanel interface.
If you don’t have an account with Vivio yet, you can start here:
https://viviotech.net/shared-hosting-linux.html
If you haven’t picked a domain yet, you can see what’s available here:
https://viviotech.net/domains.html
Domain Types in cPanel
The first time you log in to your cPanel account, you may notice that there are a lot of options under the “Domain” heading. In this section, we’re going to focus on four of those options, and explain what they do.

Redirects
Domain Redirects are useful when you have multiple domains that you would like to go to the same domain. So, for example, if your domain changes over time, a domain redirect can be used to take visitors of your old domain and redirect them to your new domain. Domain redirects are also useful if you own multiple TLD’s (.net, .com, .org, etc). For example, if your primary domain is viviotech.net, but your visitors always like to type in viviotech.com, you can use a domain redirect to redirect users who type in viviotech.com get redirected to viviotech.net.
It’s important to note that when you use a redirect, the URL that shows in your browser window will change from the URL that was typed in to the URL that you’re redirecting to.
Aliases
Domain Aliases are very similar to Domain Redirects, in that they will take one domain and show you another, but the primary difference is that the URL that you see in your browser will not change when you use an Alias.
Other important notes about Alias Domains would be that they do not have their own logs, stats
Because Domain Aliases can be used for some kinds of abuse, they are not available on Vivio’s Standard Shared plans.
Subdomains
A “Subdomain” is the first part of a URL that comes before the domain name. Take Vivio’s URL for example:
https://
This is the protocol. In this case, it tells your web browser to access this domain using the “HTTPS” protocol – which supports encryption and protects your privacy.
www
This is the subdomain. It’s a name that comes before the primary domain and commonly refers to a specific server or server type. Other common subdomains include: mail (mail.viviotech.net), ftp (ftp.viviotech.net), or topic-specificsubdomains like “affiliates” in affilaites.viviotech.net, or “blog” in b
viviotech
This is the actual domain.
.net
The Top Level Domain, or TLD. TLD’s are owned and managed by organizations registered with ICANN who maintain the TLD servers and set pricing for their TLD’s.
So, with the cPanel Subdomain interface, you can create different subdomains for your primary domains.
Addon Domains
Last but not least, we get to Addon Domains. Addon Domains are essentially additional domains that are hosted on your account along with your primary domain. Addon domains share the server resources that have been allocated to your account, such as storage space limits, processor and memory limits, etc.
Due to the exceptional flexibility of Addon Domains, when you add another domain to your account, you probably want to create this new domain as an Addon Domain. The process for creating an Addon Domain to your account is as follows:
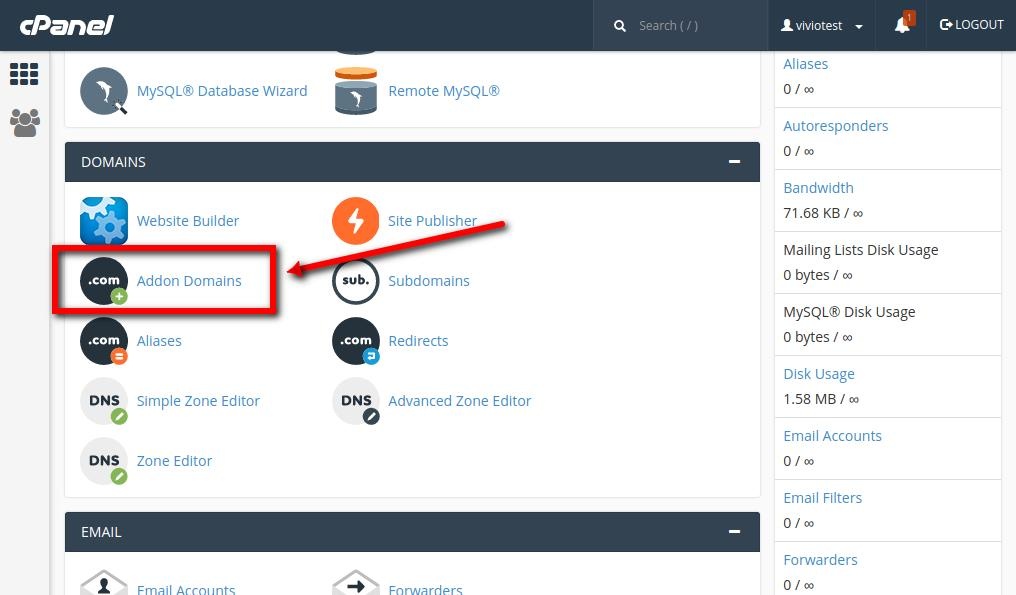
First, log in to your cPanel account and click the Addon Domain icon:
Next, you will need to fill out the “Create an Addon Domain” form, which looks like this:
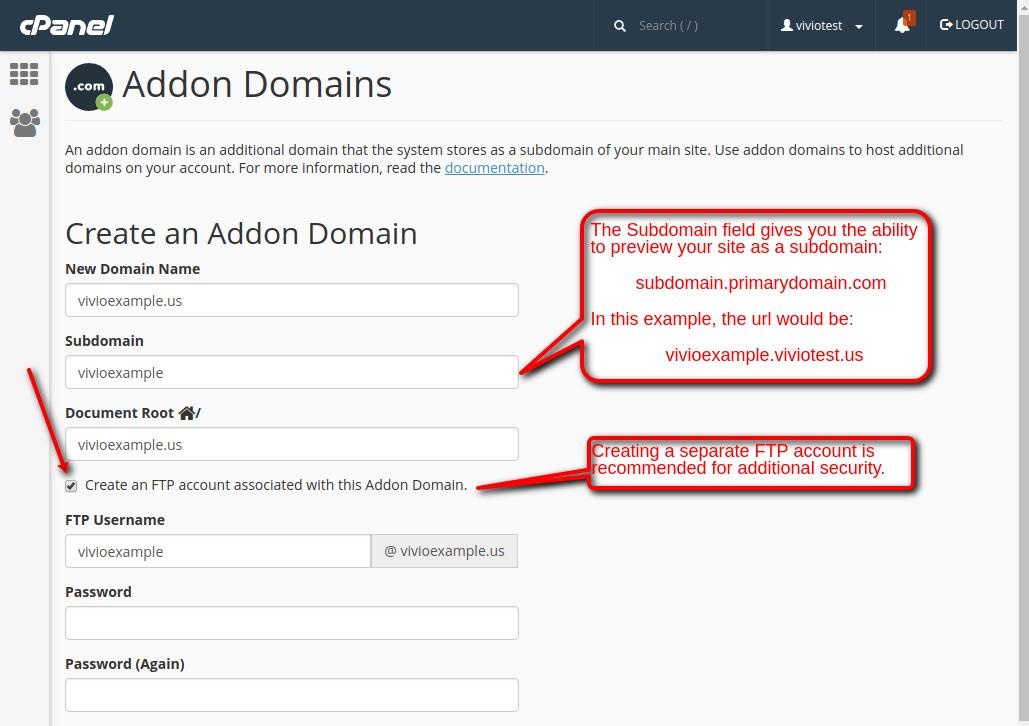
A couple of important notes about this form:
Subdomain
The subdomain field here will add a new subdomain to your PRIMARY domain that will allow you to preview your new Addon Domain before you switch your DNS to Vivio. For example, in the example image above, the primary domain is “viviotest.us” - one of the domains we use for our documentation. Since we’re adding “vivioexample.us” as the Addon Domain, our preview subdomain URL will be: http://vivioexample.viviotest.us/.
You will need to interpolate your doomains to figure out what your preview subdomain is, but if you have trouble, just give us a call and one of our friendly technicians can help you out!
Document Root
Most of the time, it’s fine to leave this set to it’s default. This will be a subdirectory off of your main root directory for your primary user. Again to use our “viviotest.us” site as an example, our user is “viviotest”, so the home directory would be “/home/viviotest/”. That means the document root for our “vivioexample.us” domain would be “/home/viviotest/vivioexample.us/”.
Again, if that’s confusing, don’t worry! Just call us, email us, or chat us up on live help and we’ll be happy to walk you through it. We like helping!
Create FTP Account...
Vivio highly recommends you create a separate FTP account for your Addon Domain in order to enhance the security of your account. Note that your FTP username will look like an email address.
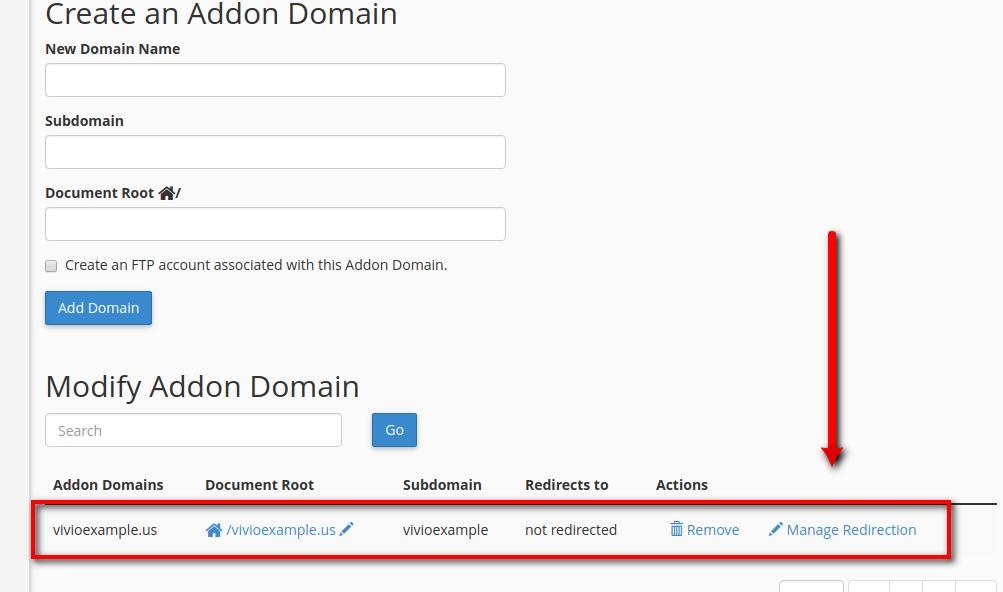
Once you’re done adding your domain, it will show up in a list of Addon Domains that are on your account, like what is shown here:
In Conclusion
Now that you’ve created your Addon Domain, you can add your site files to it using FTP, and preview your domain using your “Subdomain Preview URL” to preview your site before you release switch your doamin’s DNS over to Vivio.
If you still have questions, simply contact our Support team via email, web chat, or telephone.