Webmin is a control panel for administering your server, including the OS, firewall, scheduled tasks, software, and much more. Virtualmin is a module built on top of Webmin, where you can create and manage virtual servers, including the files, databases, and email for the domains you host on the server.
When you log in to the Webmin control panel with a user with elevated permissions, such as the root user, then you will have access to both Webmin and Virtualmin components of the control panel. This means you can manage the server itself as well as each of the individual virtual servers that are configured on the server via Virtualmin.
Step-by-step guides in this article:
- What URL Do I Access Webmin With?
- What Username and Password Do I Use to Log in With?
- How Do I Change the SSL Certificate Used by Virtualmin?
- How to Change Webmin SSL Mode (enable/disable HTTPS)
- Make Sure Your IP Address is Allowed to Access Webmin
What URL Do I Access Webmin With?
You can access Webmin with any hostname or even the server IP, followed by the port configured for Webmin, which by default is port 10000. Something to keep in mind though, is that Virtualmin is configured, by default, to use SSL which means you have to access Webmin using HTTPS:// in your browser.
https://your-server-name.viviotech.us:10000/
Note, in the above example hostname, you will need to change "your-server-name" to the actual VPS hostname assigned to your server upon setup. The hostname you use to connect to Webmin securely can of course be changed. Skip down to the section for configuring SSL on Webmin for more information on this.
What Username and Password Do I Use to Log in With?
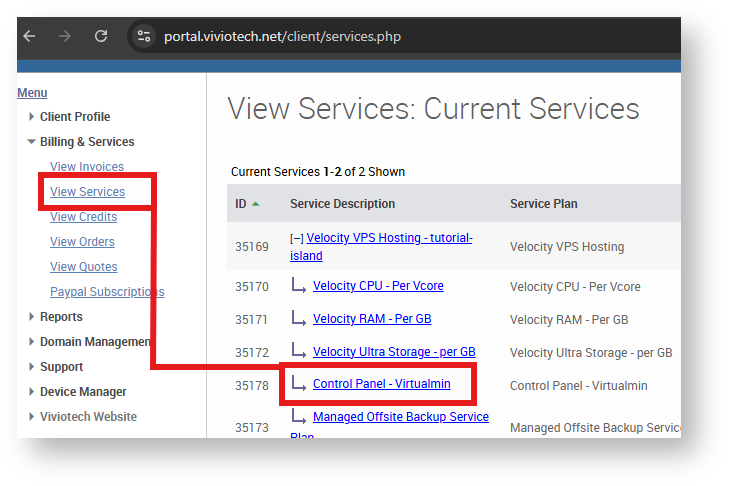
If you are the server administrator, you can use the root credentials assigned to your server by Vivio. You can find these credentials in your Vivio Account Portal (https://portal.viviotech.net/) under your list of services by clicking on the sub-service related to Virtualmin Control Panel for the server in question. See the screenshot example below:
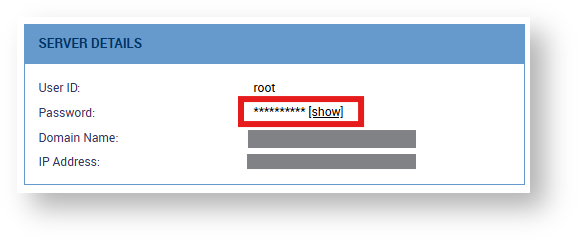
On the following page, you should see a Server Details section that contains the username and password. Click on the show button to view the password.
You can also log in with a Virtualmin administrator user, which is a user that has control of a single virtual server setup on the server. This means you will not have access to server-level features (Webmin), nor will you have access to other Virtualmin sites that are set up on the server. These credentials are great for resellers to give to their clients, since they will only have access to their single site in Virtualmin.
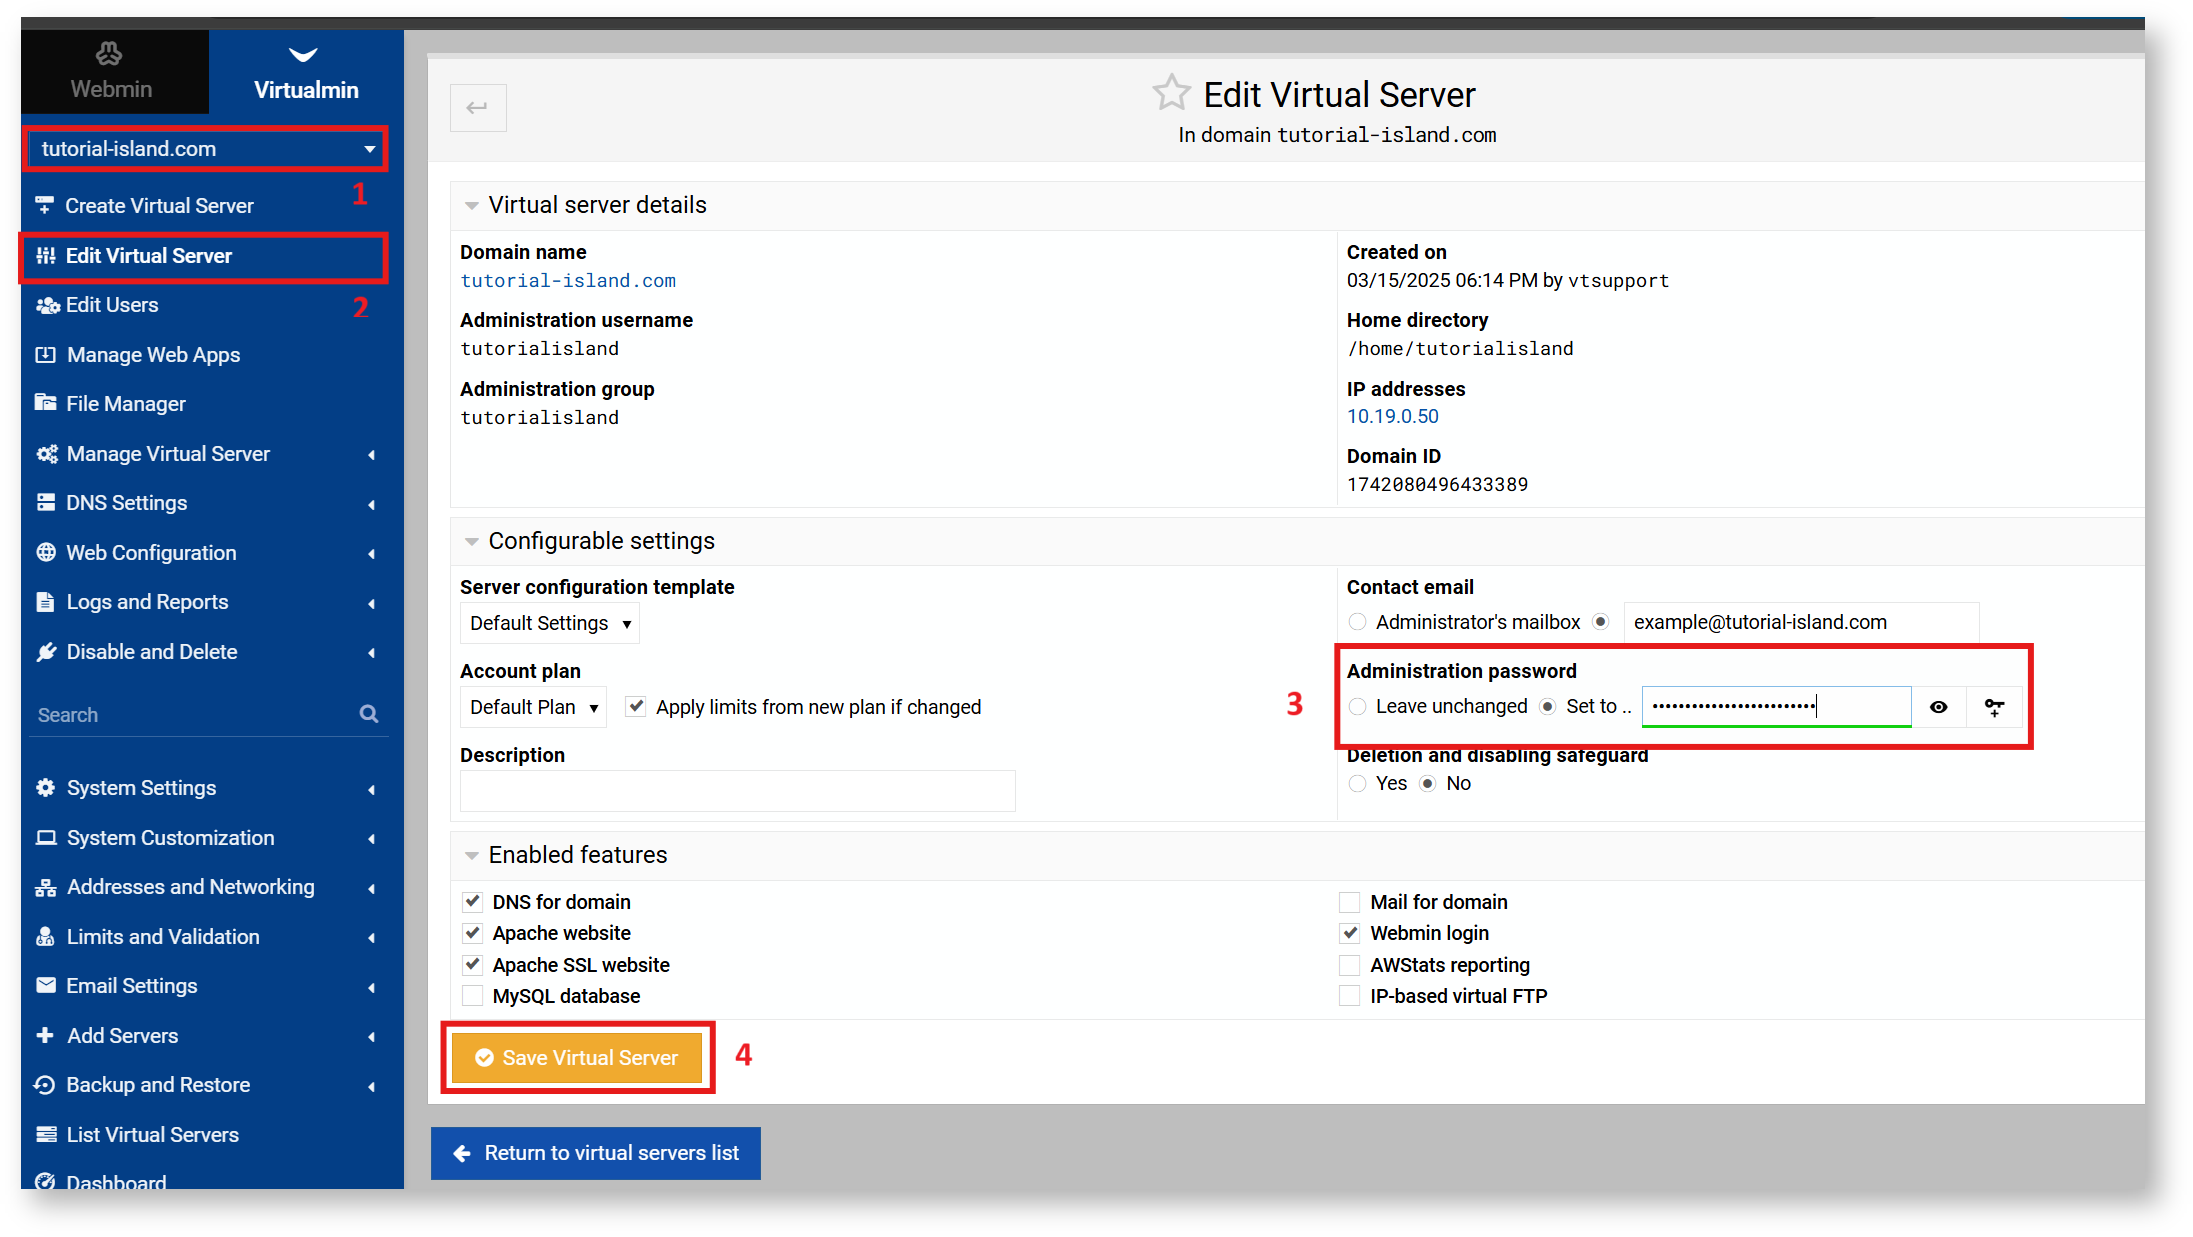
You can change the password for a Virtualmin administrator user with a user that has elevated permissions (such as root) by logging into Virtualmin and selecting the website in question from the drop-down, then choosing Edit Virtual Server. On this page you can see the username for the administrator and you will also have the ability to change the password.
How Do I Change the SSL Certificate Used by Virtualmin?
We configure a wildcard *.viviotech.us certificate by default to cover connecting to your server via your server hostname. However, if this certificate expires and you need to renew it, or you desire to change the certificate to cover a different hostname, then follow the steps below:
1. Log in to your Webmin control panel, as outlined in the first section of this article.
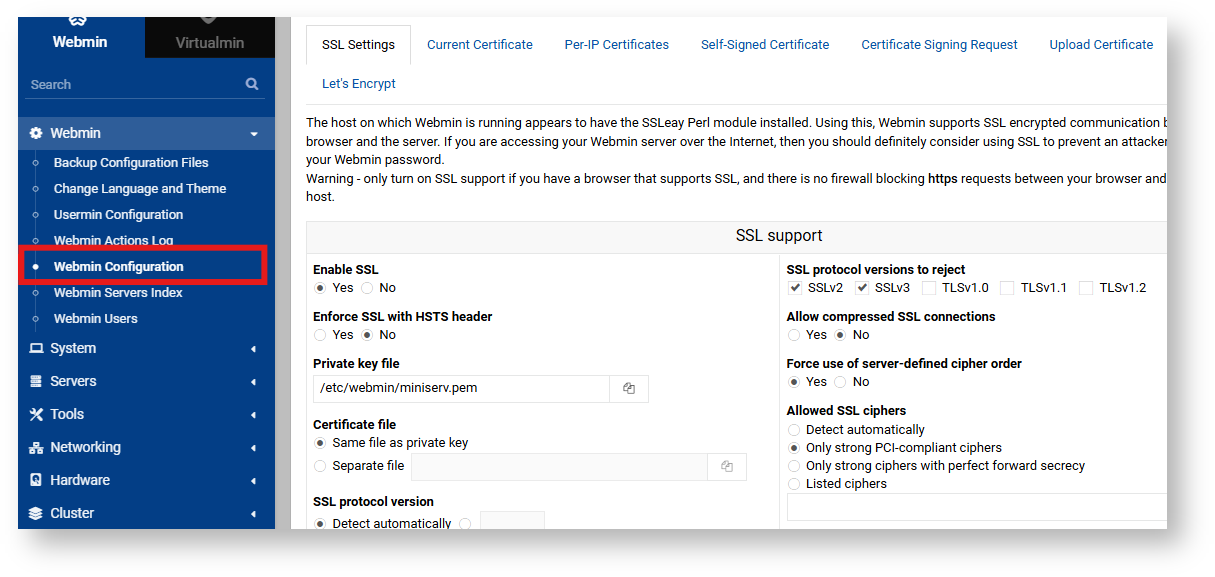
2. On the left-side navigation, make sure you are on the Webmin tab.
3. Expand the Webmin drop-down and choose Webmin Configuration.
4. Click on the option labeled SSL Encryption.
5. If you want to upload a new certificate, first make sure you have the associated key, certificate and certificate authority certs that you wish to upload. Then click on the Upload Certificate tab. If you wish to use Let's Encrypt then click on the Let's Encrypt tab.
- If using Let's Encrypt, enter each of the hostnames you wish to be included with the certificate. Note that the hostname must point to the server and cannot be behind a proxy service like Cloudflare or Sucuri when using the default validation method. Other validation methods are available but require additional configuration.
- If you are uploading a new certificate, then make sure you provide the correct certificate and key before saving. Once done, go back to the SSL Encryption page, then choose the tab labeled CA Certificate and proceed to update the CA cert associated with your uploaded certificate.
How to Change Webmin SSL Mode (enable/disable HTTPS)
Enabling or disabling SSL on Webmin can be done either via Webmin itself or directly via SSH. We'll show how to do both below:
Steps to enable/disable Webmin SSL mode via Webmin
1. Log in to Webmin, as discussed at the top section of this article.
2. On the left-side navigation, make sure you are on the Webmin tab, if not select it now.
3. Expand the Webmin section and choose the option for Webmin Configuration.
- You should already be on the SSL Settings tab. If not, select it now.
4. On the Enable SSL option, check the box according to your desired value:
- Yes - When checked will require you access Webmin via an SSL encryption using the
https://protocol. - No - When checked will require you access Webmin via the plaintext
http://protocol.
With how easy it is to implement an SSL certificate to cover any hostname you want to use for Webmin we recommend keeping SSL enabled. Only in situations where the server's OS is extremely outdated and not supporting modern encryption have we disabled SSL mode, but even in those cases we recommend updating your OS to support newer SSL encryption.
Steps to enable/disable Webmin SSL mode via SSH
This process requires you already have access to SSH on your server. See our guide on accessing your server via SSH for more information on getting connected.
1. In your SSH terminal, make a backup of the current Webmin configuration file. It is always a smart move to back up files before making changes just in case something goes unexpectedly wrong. You can make a backup using the cp command, which is a command for copying a file. Simply run a command similar to the one show below:
cp /etc/webmin/miniserv.conf /etc/webmin/miniserv.conf.bak
- You can change the destination file to whatever you prefer. A good idea is to name the file relative to the date timestamp you changed it, such as
miniserve.conf_06_08_2025for example, so you know when that file may have been from without running additional commands to see the timestamps of the file.
2. Now that you have a backup in place, edit the file using your favorite text editor such as vi or Nano.
#example using vi
vi /etc/webmin/miniserv.conf

#example using nano
nano /etc/webmin/miniserv.conf
If unfamiliar with any Linux text editors, we recommend starting with Nano and brushing up on the general commands beforehand. After some research and practice you may use more advanced editors like vi, for example.
3. In the file, find the line correlating to the SSL mode configuration, such as the below example:
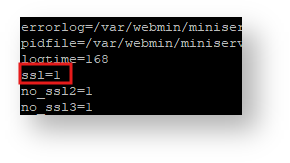
4. Change the mode to either 0 or 1 depending on your desired outcome:
- 0 - Setting the value to ssl=0 will result in SSL mode being disabled and you will have to login to Webmin using
http://protocol. - 1 - Setting the value to ssl=1 will result in SSL mode being enabled and you will have to login to Webmin using the
https://protocol.
5. If you make a change to this file, then you will need to restart the Webmin service for the change to take effect. To restart the service, simply run the command below:
# Command for Ubuntu/Debian
sudo systemctl restart webmin

#CentOS/RHEL/AlmaLinux/Rocky
sudo service webmin restart
Depending on your server's OS, you can run of the above-mentioned commands to restart the service. After making the change and restarting the Webmin service, the SSL mode should be updated and you can test via your browser to make sure you can access via the expected protocol (http:// or https://).
Make Sure Your IP Address is Allowed to Access Webmin
Locking down Webmin to only be allowed from a specific list of IP addresses is always recommended. If such a restriction is in place on your server's firewall, you may find yourself unable to access the Webmin service until you add your IP address to the allowed list. The method to update the firewall depends on what firewall you are using on the server, but in any case will require that you access the server via SSH (which may also be locked down, in which case reach out to our support if you need help).
The popular firewalls are listed below with commands you can run to add your IP to the allowed list:
iptables
The iptables firewall is installed on most Linux systems, even if it is not actively in use (e.g., detached from all interfaces or set to allow all traffic by default). If iptables is your primary firewall, use the commands below to whitelist your IP address for accessing Webmin on port 10000.
# List all iptables rules
iptables -L

# List rules with line numbers (useful for deletion or insertion)
iptables -L --line-numbers

# Allow your IP to access TCP port 10000 (Webmin). Update the IP in the rule below to your actual IP.
iptables -I INPUT -p tcp -s 123.123.123.123 --dport 10000 -j ACCEPT
By inserting your IP to the allowed list for port 10000 using the command above, it will allow you to access the port for the current session. If you want this setting to persist across reboots, be sure to save your iptables ruleset:
# Debian/Ubuntu
iptables-save > /etc/iptables/rules.v4

# RHEL/CentOS
service iptables save
FirewallD
FirewallD is a popular firewall built on top of the Netfilter framework, including iptables and nftables. It uses zones to define trust levels for network connections and is easy to manage. While you can manually update the firewall files directly and then reload FirewallD, we generally recommend using the firewall-cmd CLI to view or make setting changes. Below are some helpful commands to help you manage your FirewallD instance.
# View all rules in the default zone
firewall-cmd --list-all

# Permanently allow your IP address to access TCP port 10000, please change the IP to your actual IP
firewall-cmd --permanent --add-rich-rule='rule family="ipv4" source address="123.123.123.123" port protocol="tcp" port="10000" accept'

# Reload FirewallD (after making any changes)
firewall-cmd --reload
Note, that after adding/removing IP addresses using FirewallD you must perform the firewall-cmd --reload command in order to reload the active service to have the rules take effect. If you remove the --permanent flag then the change will only be for the active session so it will not persist across reboots.
Also, note that FirewallD is built on top of iptables or nftables so making changes directly to those is not recommended, as FirewallD will overwrite your changes if enabled.
After making the change and reloading the FirewallD service, you can run the list rules commands as needed to verify that the rules are in place as they should be.
UFW
ufw is a simplified interface for managing firewall rules on Debian and Ubuntu-based systems. It's designed to be more user friendly, when users find iptables or firewalld to be too complex. Below are some helpful commands for managing ufw.
# Show current firewall rules
ufw status numbered

# Allow your IP address to access TCP port 10000. Replace the IP below with your actual IP.
ufw allow from 123.123.123.123 to any port 10000 proto tcp

# Reload UFW to apply changes (if needed)
ufw reload
After adding your IP to the allowed list, you must reload ufw to apply the changes. Also note that if ufw is not actively used, the first command for ufw status will return an inactive response.
Need Further Assistance?
We've got your back! Create a Support ticket in your account portal.