Two-factor authentication is a security system that provides additional protection for your online accounts. It works by requiring a time-based one-time password, in addition to your username and password, when logging into your Vivio Portal account.
To get started, you will need to install a token generator application on your mobile phone, such as Google Authenticator, Duo Mobile, or Authy.
Step-by-step guides in this article:
- How to add two-factor authentication
- How to remove two-factor authentication
- Changing 2FA permissions for your other users
How to add two-factor authentication
Follow these steps to enable two-factor authentication (2FA) on your account.
Step 1: Log in to the Vivio Client Portal. If you need assistance with this step, please see How to access your Vivio Portal client account.
Step 2: Under “Client Profile,” select “View Profile.”

Step 3: Scroll down to “Two-Factor” within the “AUTHENTICATION” section and select “Click to enable.”

Step 4: In the new pop-up that opens, re-enter your Portal account password and select “Next.”

Step 5: In the new pop-up that opens, use the token generator application on your mobile phone to scan the QR code or enter the key manually to set up a new account. Then return to this pop-up window and select “Next.”

Step 6: In the new pop-up that opens, enter the security code that was generated by your mobile authenticator app and then click “Complete Enrollment.” This will verify that the 2FA was set up correctly.

Step 7: A message will appear at the top of your screen. “Success: Two-Factor Enrollment Complete.” Your two-factor authentication is now ready to use the next time you log into your Vivio Portal account.

If you need any help adding two-factor authentication to your account, please get in touch with our Support team.
How to remove two-factor authentication
Follow these steps to disable two-factor authentication (2FA) on your account.
Step 1: Log in to the Vivio Client Portal. If you need assistance with this step, please see How to access your Vivio Portal client account.
Step 2: Under “Client Profile,” select “View Profile.”

Step 3: Scroll down to “Two-Factor” within the “AUTHENTICATION” section and select “Click to disable.”

Step 4: In the new pop-up that opens, re-enter your Portal account password and select “Disable Two-Factor Authentication.”

Step 5: A message will appear at the top of your screen. “Success: Two-Factor Has Been Disabled.” Two-factor authentication is no longer required the next time you log into your Vivio Portal account.

If you need any help removing two-factor authentication on your account, please get in touch with our Support team.
Changing 2FA permissions for your other users
Follow these steps to let your other contacts add two-factor authentication to their profiles.
Step 1: Log in to the Vivio Client Portal. If you need assistance with this step, please see How to access your Vivio Portal client account.
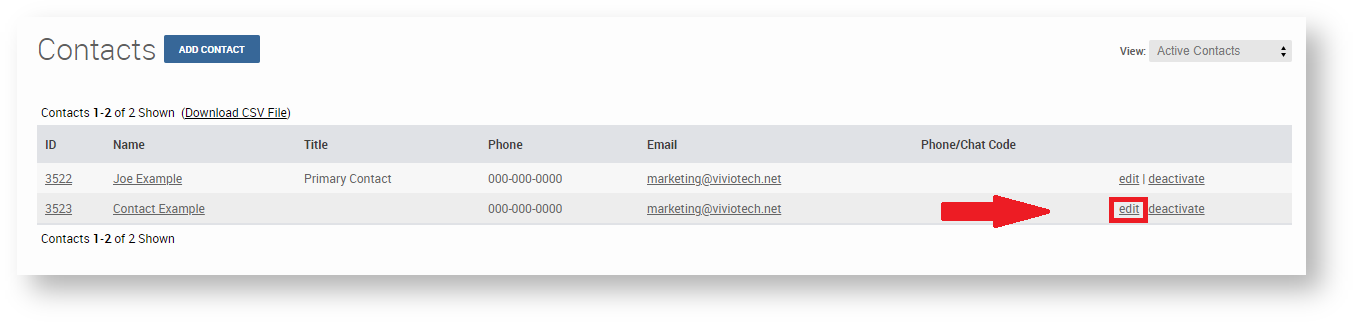
Step 2: Under "Client Profile," select "View Contacts."

Step 3: Select "Edit" on the line to the right of the contact. A new pop-up will open.
Step 4: In the new pop-up that has opened, select the "Permissions" tab at the top.

Step 5: On the "Client Profile" line, under "View," select "Allow." Then select "Update" to save this change. The pop-up will close.

Step 6: A message will appear at the top of your screen. "Success: Contact updated." This user is now able to add two-factor authentication to their profile. Repeat these steps for each additional user.

If you need any help changing the permissions for two-factor authentication, please get in touch with our Support team.